Contents
Chain link types
Bike chains nowadays have a master link or the quick link, which makes chain disconnection, reconnection, and replacement convenient. What the master link does is connect the two ends of the chain’s inner plate ends.
Master links are quick-release links that come in all shapes and sizes and the master links before have evolved into different styles. Here’s a list of the different types of chain links:
See also:
Retaining clip master link
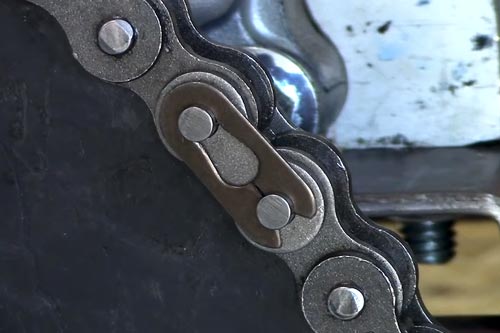
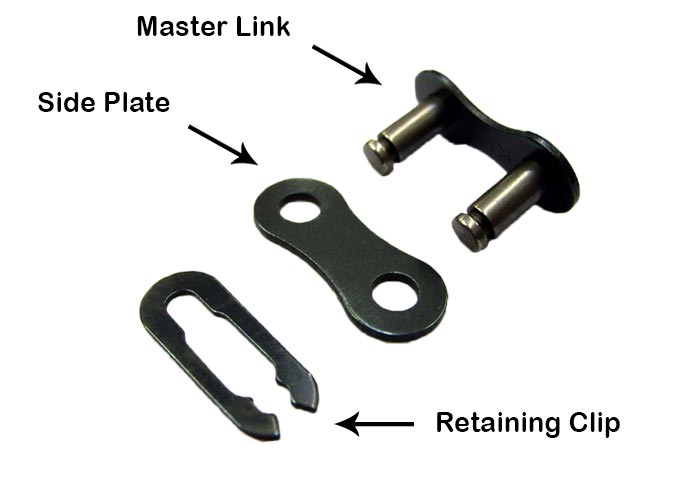
This is the traditional type, which has two holes. Usually, this is the type that is compatible with straight-chain lines. Typically, master links of this type are reusable, so long as they are not worn out and that they are disconnected properly from the chain.
Modern master link
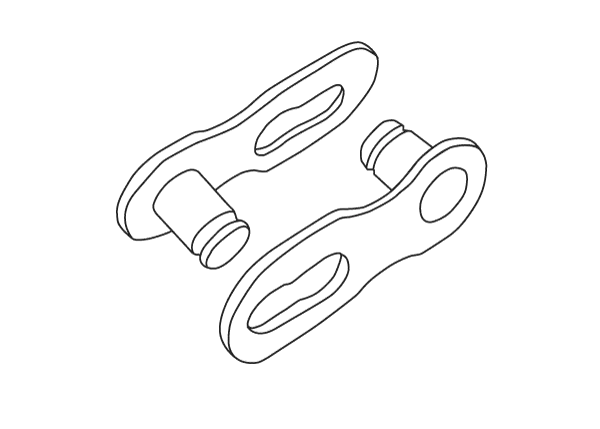
This modern type is compatible with external derailleur gears. It forms opposite fitting unlike the straight-chain line compatible type of chain link. The modern maser link is usually more difficult to remove and might need special tools.
Chain without master link (using connecting rivet)
Old chain links use a connecting rivet, by which you just need a rivet tool to disconnect them. Usually, you won’t find these chain links in the market anymore but you might find them in old shops and second-hand bikes.
How to remove and install bike chain master link
Now that we’re familiar with the different master links, how do you remove and install one? This guide will help you out.
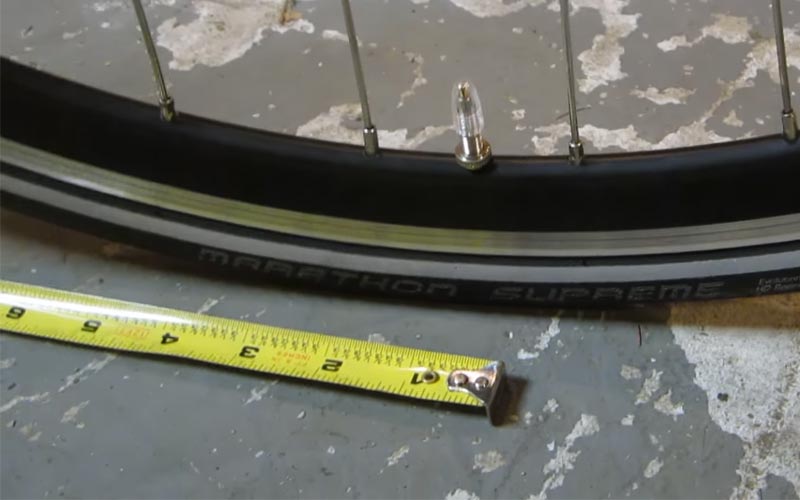
First of all, when buying a new master link, check the correct size. It is important to know the width and speed depending on the bike that you have. Most manufacturers say that a master link is a one-time use but it still depends on your preference and if you disconnect it properly, it could still be usable if it doesn’t have wear.
Removing the master link
Below are the steps to removing the master link:
1. Use chain pliers
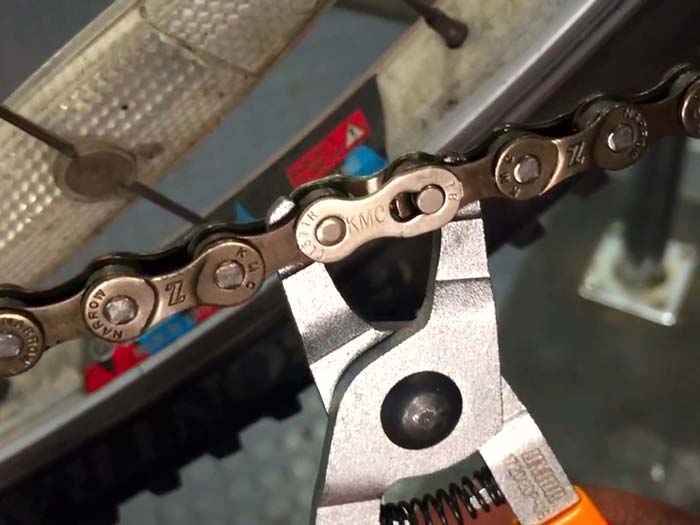
The first step is to use chain pliers to remove the quick connect links. Most bike shops sell chain pliers and you’ll get your hands on one quite easily.
2. Exert some effort
Simply insert it and squeeze as tightly as you can. After the effort has been done, the quick link should come out easily.
As we mentioned above, some manufacturers say that they’re a one-time use but others say that they are reusable, but generally, they can be removed and reused as long as they still stick together.
In general, as long as it’s still not worn, it is still used several times. A word of advice: just don’t use them for extremely worn-out chains so that they won’t catch dirt, grime, and corrosion.
Installing the master link
Congratulations, you were able to remove the master link! Now that you’ve removed the old link, it’s time to replace it with the new master link. Here’s how:
1. Follow the user’s manual
You should see some direction arrows from the user’s manual show you the direction. From there, this is the configuration on how you should install it. Simply follow the chain travel as you are pedaling normally.
2. Insert the pins
To install the quick link, insert one pin each on both ends of the chain. It’s just the matter of combining them and snapping them. Make sure that they fit together properly.
3. Put the chain back to the bike
Simply install the chain back onto your bicycle and pedal the bike around. After that, make sure to get your bike chain master link on the top side of the chain. For added protection, put some torque to keep it tight, such as pushing it.
How to remove and shorten a bike chain without a master link
Supposed that you have a bike chain that doesn’t have a master link – how do you manage? How can you remove and tweak a bike chain with no such quick-release link? Imagine what your grandpa used to do when disconnecting and reconnecting the chain – of course they had tools and mechanisms!
First of all, to do the steps mentioned below: make sure your chain does not already have a quick-release link. To do this, simply turn the pedal backward and look for the quick-release link, if any. A master link should stand out from the rest by having a slightly loose or off-pin insertion than the others.
However, if you can’t find one, it is a traditional type of chain that requires a tool for both removal and installation. With that said, here’s a guide on handling your bike chain even if it doesn’t have a master link. Check out the different sections below:
Disconnecting your bike chain
First, we’ll learn how to disconnect your bike chain. It’s a little tricky because you need a special tool to do this. It’s also different from disconnecting with a bike chain master link.
1. Start working with your chain tool
A chain tool is a special type of mechanism that allows you to either loosen or disconnect/reconnect your bike chain if it doesn’t have a master link. To do this, turn the handle of your chain tool counterclockwise to be able to fit the chain on the outermost slot.
When you inspect the chain tool, you will notice that it has two slots:
- An outer slot is for disconnecting, reconnecting
- An inner slot is for loosening chain links
2. Insert your chain
Look for the area where your chain will fit into the tool. Since you want to disconnect your chain, put it on the outer slot. Tighten the handle clockwise until the chain tool’s pin connects with the end of your chain’s pin.
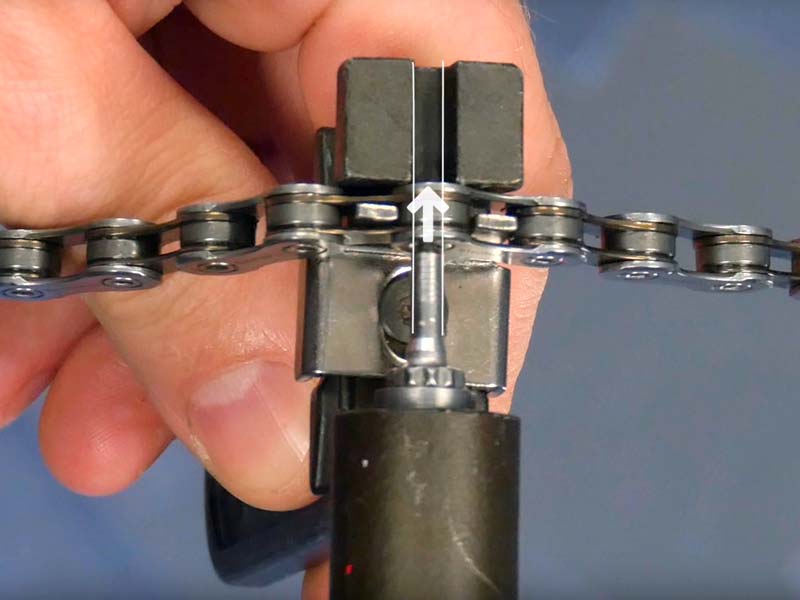
3. Tighten the chain tool
After you’ve inserted your chain, tighten the handle until the chain pin gets pushed to the link and comes out from the other side. Next, push the chain pin far enough halfway through the first of the 2 outer chain pins.
Keep in mind that if it gets pushed out of the chain, you can’t get it back and you’ll unintentionally shorten your chain. This is why you need to be careful and turn the handle as gently and slowly as possible while you push the pin through.
Here’s a tip: when you are close to the end, check any kind of resistance when the handle becomes slightly difficult to turn. Stop during this time when tightening the handle and give it a half-turn.
4. Disconnect the chain
As mentioned above, disconnect the chain in this area (the one with the difficulty of turning). When you take the chain out, it can be easily disconnected despite the tight look. All you need to do to disconnect the chain is to twist and pull the chain apart.
When you observe the disconnected bike chain, you will see that a tiny bit of the pin is protruding out of the pin. This specific protrusion will help in reinstalling the pin easily.
Reconnecting your bike chain
Now that you’ll want to reconnect your bike chain again, either after getting a new one or cleaning it overnight, here’s how to do it:
1. Twist and push
First, twist and push the links back together until the chain pin clicks back into the inner link, holding the chain together.
2. Move your bike chain to the tool
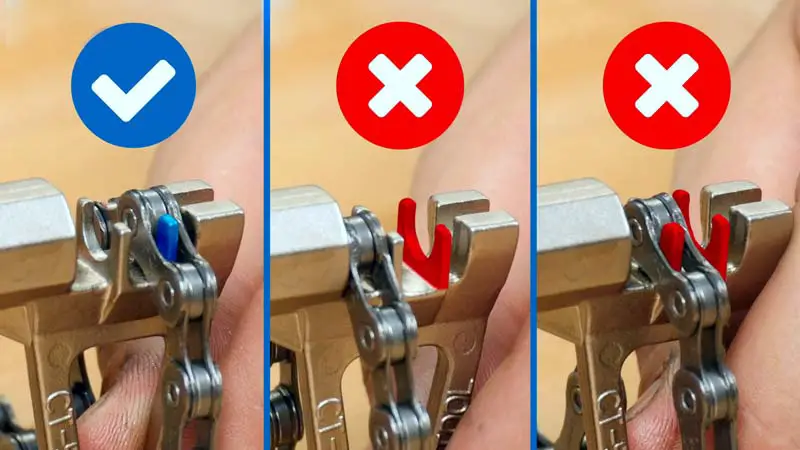
Next, back off the chain tool’s handle and then place the bike chain back on the outer slot of the chain tool. You should position it so that the protruding chain pin faces inward toward the chain tool’s pin.
3. Start tightening the chain
Tighten the handle until the tool pin starts pushing the chain pin back through the link. Continue tightening until a tiny bit of the link pokes through the other side. To check if you did the right step, make sure that on both sides of the link, the chain pin should have the same protrusion as the other side.
Loosening the bike chain after reconnection
Now that you have reconnected your bike chain, the process of reconnecting caused the chain links to compress together, making a stiff link. To fix this, use the inner slot on the chain tool. Here’s how to loosen your bike chain after reconnection:
1. Setup the chain with the tool
First, back off the chain tool all the way and put the chain into the inner slot.
2. Start tightening the chain and tool
Next, tighten the chain tool’s pin until it connects with the chain pin and tightens it just barely, about 1/4 of a turn. With this method, it loosens the chain link plates enough.
3. Take out the chain
Remove the chain from the tool and make sure the link is loose Check the chain’s looseness or tightness. If the chain is still too tight, put it back to the chain tool and loosen it with another quarter of a turn.
How to Remove and Install a bike chain Quick Link, Master Link using home Tools
In emergencies, you might not have a lot of tools lying around. Quick links or master links might not be easily removable with just any tool, so it’s important to use the right kind of tool that’s closer to the original tool meant for it.
Here are two methods that you can do at home or in an emergency in disconnecting your bike chain’s master link:
Method 1:
To remove either the quick link or master link with two pairs of pliers is a great way to pull through with a bike chain change when your situation isn’t that good. Here’s a guide on getting off a quick link or master link without any tools:
1. Prepare your tools
Grab two pairs of pliers and an old gear cable (not brake cable) because a gear cable is thinner and works better in this situation.
2. Locate the holes
On either side of the quick link, there’s a hole. Locate it at first – you can use a flashlight or light source to help you out.
3. Insert the gear cable
Put the gear cable through the first hole and on the other side of the hole. Repeat the process two times. You will notice that it gets tighter the second time and has added friction.
4. Start pulling
Pull it together on both sides. You will notice that there’s a sort of knot around the quick link now. Use the pliers and pull apart the cable as hard as you can and as needed – this will help release the quick link. With some effort, it will automatically snap.
Using this method, you don’t need any tools and the quick link and/or master link will simply go off. It’s that easy!
Method 2:
This method is also a DIY hack that you can do at home. Here’s how you can use a steel wire clothes hanger for the job: simply squeeze the two pins of your bike chain master link using the hanger to open the link.
If you don’t have a gear cable, this is a method that you can use. Do note that the clothes hanger needs to be made of steel wire.
Remove KMC quick link by hand without any tools
While many steps require at least a couple of tools, if you’re in a situation where you do not have a tool at hand, you can take off your quick link by hand with an easy method. Here’s how you can remove your KMC quick link with zero tools needed:
1. Get your hands protected
Since you won’t be using any tools, it’s best to use gloves as a means of protection from the gunk and dirt from your bike chain and parts.
2. Prepare your bike chain
For the next step, take your bike chain off the front chainring. Look for the quick link from the lineup in the chain and bend it down on itself so it is in the shape of a letter Z.
3. Start pushing the master link
To do this, push on top of the bottom of the Z shape with your thumb and forefinger of your dominant hand.
4. Pull the chain from both sides
After putting it into a Z-shape and exerting effort, pull the chain and instantly, automatically, the quick link will be easily removed with both hands.
Q&A
If you’re a little confused, here are some FAQs to help you out with bike chain master link removal and handling:
I can’t find the master link on my bike chain
Are you having trouble locating your master link in the chain? To make it easier for you, use a bike stand. Alternatively, you can flip the bike to one side so that it uses the saddle and handlebars to rest. This will help you easily locate the master link on the chain, wherever it is.
The master links should look different from the rest of your bike chain. As we mentioned above, master links or quick links have a differently aligned pin. In some cases, master links may also have a different shade or color, such as gold, making them much easier to locate. Keep spinning the chain until you see the master link.
Can I reuse the master link?
It depends on the manufacturer, as well as the type of master link that you have. Typically, master links for 8- and 9-speed chains are reusable. This also goes for the old type of master link as mentioned above (the one with two holes instead of one).
However, 10- and 11-speed master links might not be that reusable due to the risk of damage when you take it off your bike chain. Aside from that, modern master links are also typically a one-time use due to their renewed design.
When you’re in doubt, you can ask a local bike shop or fellow bike enthusiast to check if your existing master link is still usable and in good condition.
What type of master link is best for my bike?
Generally, it’s a matter of user preference. However, here’s a lowdown on the different types of master links:
1. Rivet style
Many cyclists greatly claim that the rivet style is, by far, the most durable type because it keeps the bike chain more secure. If you are serious about your cycling, it’s best to go with a rivet type. That’s because rivet types won’t easily go haywire due to their security. The slight con, however, is the added weight.
2. Clip style
Cyclists who prefer convenience might go for the clip style instead. When installed properly, a clip-type master link is still quite safe. If you intend to ride a bicycle for casual use, clip-type master links are convenient for setup. However, the slight downside is that rivet types are more secure than clip types.
However, to be on the safe side, it’s best to ask the manufacturer about the recommended type of master link that should be used on your bike chain. Different speeds of drivetrain may require a specific type of chain link.