Center-pull brakes are commonly found in vintage road bikes. Typically, most bike enthusiasts want to restore such vintage bikes and make them applicable for riding, in which they have to deal with adjusting the center-pull brakes.
With that said, the stopping power of the center-pull brake might turn some people off as compared to modern bikes. If these center pull brakes are not set up properly, they could compromise your riding safety.
See also:
Although you can outfit your vintage road bike with a modern type of brake, some people might not prefer this because center pull brakes are one of the key features of a vintage road bike. So, if we were to take away that kind of brake, it would defeat the very purpose of being a vintage bike for that specific bicycle simply because we replaced the brake system with a modern type.
It is possible to work on improving the stopping power of any center-pull brake. While you’ll never get your center-pull brake to give you the stopping power that’s similar to that of disc brakes and other modern types, you can still significantly improve its power using a couple of adjustments.
Contents
What you’ll need
- torque wrench
- adjustable wrench
- 10 mm wrench
- bar clamp
- bungee cord
Steps on how to adjust the center-pull brakes
Here’s how to adjust your center-pull brakes, as well as maintenance tips.
1. Adjust the height of the brake pad
You’ll want the brake pad to sit as low as possible on the rim. That’s because they tend to move up as they compress. Moreover, you’ll also want to make sure that they do not hit the tire to avoid quickly wearing the tire out.
Likewise, you should also check to see if the brake pads enter in full contact with the rim to get as much friction as possible. Use your adjustable wrench and 10 mm wrench to loosen the bolt, and then put your finger flush at the bottom of the rim.
Lower the brake pad until it hits your finger. Once it does, tighten the bolt by hand so that it stays in place. Use the torque wrench and the adjustable wrench and finish tightening the bolt to about 5 to 6 nm. Make sure that the brake pad is level with the rim.
You may need to lower the front a little bit as needed using the adjustable wrench. Once you’re done with one side, do the same procedure with the other brake pad.
Adjust the position of the straddle wire carrier on the cable using the pinch bolt. This is done so that the brake pads are as close as possible to the rim without touching the rim while in the rest position.
2. Adjust the pinch bolt
Next, you will need two improvised tools: a bar clamp and a bungee cord. Position the bar clamp through the wheel. Then, compress the brake pad until they touch the rim, but don’t overdo it.
Using the bungee cord, hook it around the straddle wire carrier. Without applying any tension, secure it to the handlebar so that it stays up. With your brake pads touching the rim and the straddle wire carrier staying up, your hands are free to do other operations on the bike brakes.
Use an 8 mm and a 9 mm bolt to loosen the pinch bolt and pull the cable slightly with your hand. Tighten the pinch bolt back and remove the bar clamp and the bungee cord. Check that your brake pads are about 1 to 2 mm from the rim.
This step takes a bit of time because sometimes, it could become too tight or too loose, so you may have to do it 2 to 3 times until you get it right
3. Check the lever spacing
Check that when you apply pressure on the brake and they touch the rim, you should have a minimum of 1 inch between the brake lever and the handlebar – use a ruler for this. Some riders prefer 1-1/2 inches, which is also okay.
Once you finish this procedure, you cannot remove the wheel without deflating the tire. However, this is a minor inconvenience when considering good brakes.
Here are a couple of additional tips:
- Don’t tighten the pinch bolt too hard because it will start fraying and damaging the cable.
- Make sure that the pinch bolt will only flatten the wire and make sure it won’t slip while you apply pressure.
- Ensure that the brake is centered to the rim.
- Before you check the centering, make sure that the main bolt that attaches the brake to the frame or the fork should have a torque of about 6 nm.
4. Check the centering
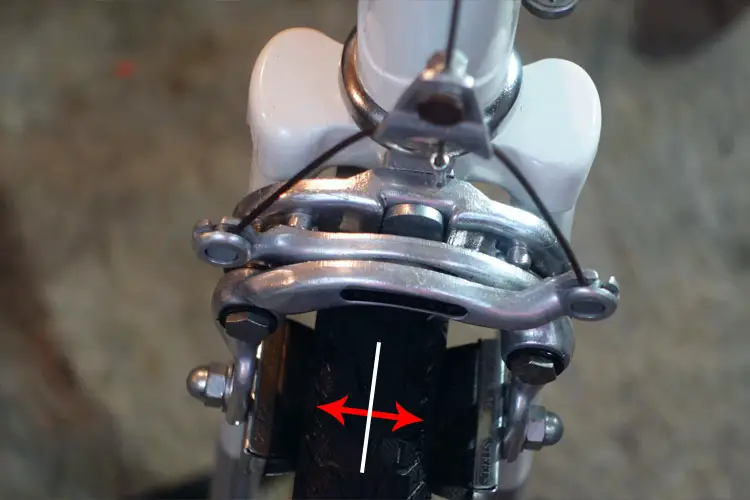
To check if the brake is centered after doing a visual check is to apply the brake and test it out. When you apply the brake, the wheel should not move and should stay aligned without moving either to the right or to the left.
If the wheel is moved to the left, it means that the brake pad on the right is too close, and vice versa. If you need to adjust the centering, use a large adjustable wrench. If the brakes need to be adjusted left, put the adjustable wrench on the bridge of the left side and lift.
Do the same procedure on the right side if needed. After centering the brakes, make one last check to see if it is centered.
5. Adjust the toe of the brake pad
You will need 2 small adjustable wrenches for this. The brake pad should hit the rim flush and the same time. With that said, some people prefer that the front of the brake pad hit the rim first.
If your brake pads are making noise, you can use this technique to quiet it down. However, in general, the rear of the brake pad shouldn’t hit the rim first. It’s either flush or the front first.
Position the adjustable wrench on both sides and bend it toward the front if needed. Again, this all depends on your preferences. Do the same procedure with your rear brake.