If you have a bike that has side-pull brakes that aren’t hitting the rim evenly, they will need to be adjusted. In this situation, you might have noticed that the brakes are not balanced. For instance, one pad is hitting the rim just fine but the other pad doesn’t do much, causing an uneven action.
Brake pads that aren’t positioned in the right way could take their toll on your rims. As the rim brake is more prone to damaging your bike parts compared to a different type of brake (e.g. disc brakes), it matters a lot how these brake pads are positioned so that both your rim and tires are safe from harm in the long run.
See also:
Not to worry, as in this tutorial, we’ll show you steps on adjusting side pull caliper brakes on a road bike. This tutorial works for side pull caliper brakes.
A 4-mm and 5-mm Allen key wrench is mostly what you’ll need for adjusting your side pull bikes. The objective is to center your bike brakes and so that the rim will get hit by the pads simultaneously.
1. Balance your wheel
You will notice that the brakes might not be the part of the bike that’s legitimately causing the problem. It could also be the wheel at fault so it’s best to check the wheel. For instance, you should check your wheel if it is properly aligned because if not, that will cause your side pull caliper brakes to have uneven hitting to the rim.
Check the alignment of the bike tire to the frames to see if it is aligned just right. If not, you can get to work by releasing the skewer of the bike wheel. Then, adjust your wheel properly so that it will align with the bike frame. Next, you can just tighten back the skewer to keep it secure.
Look to see if the brakes are already hitting evenly. If not, you may have to adjust the brake other than the wheel, which leaves us to the next steps.
2. Adjusting the brake pads manually
The rim pads should be aligned in various ways – upwards, downwards, diagonally, and from all angles, so that it will not compromise your bike brake safety.
Different brakes, whether old or new, has the same concept when it comes to adjusting them. The mounting system doesn’t differ from one another due to the presence of a single bolt.
All you need to do is to loosen that bolt and then on one side, try pivoting the brake. Tighten the bolt on that specific side.
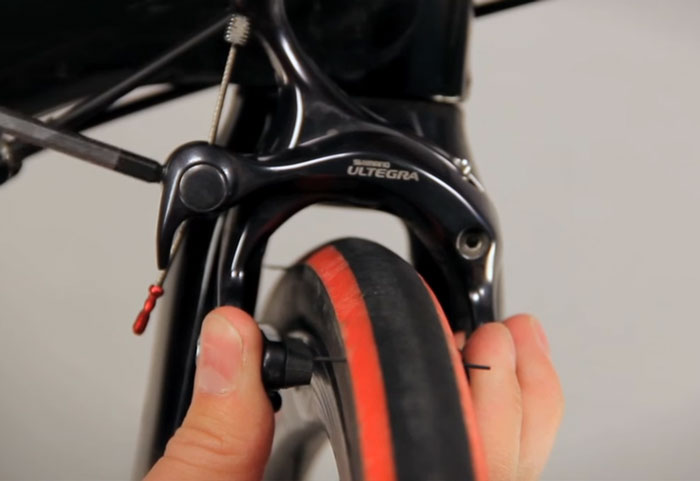
Go to the backside of your side pull the caliper brake and adjust it. To do this, look for the area where it mounts the fork frame, in which you will see something like a bolt or a nut there that is the center fixing bolt.
To fix it, loosen that bolt with your tool without taking it out of being placed. Start loading your brake so that the mounting bolt will be pivoted by the said brake (give the brake a slight shake for best results).
There are specific tools that could make your job easier, such as holding the brake to turn it. However, you can just manually pivot the brake to align the pads equally between the two sides of the rim of your bike tires.
This technique completely centers your brakes while you are holding the entire metal part of the brake. As you do this, begin tightening the bolt that was mentioned earlier.
You should have somewhat centered brake pads for this. You can test it out by applying the lever on your bike brake system to check if the two pads apply evenly to the rim.
For a situation where you’ll need to do some more extra adjustments, you can do the entire step again until you find that there’s little unevenness between the two pads. It is a matter of trial and error. You can also use the front brake lever to adjust your brake pads to align them properly.
So, what happens when your brake pads aren’t aligned properly?
- A shelf could form once your pad is positioned too low to its preferred area.
- A rim pad set that’s positioned too high will also create that shelf but it will also damage your tire and eventually cause it to blow, which you don’t want!
- An off-positioned side-pull brake pad will also diminish the capability of your brakes, causing you to expend more power and force when you don’t need to.
Once you find that your brake pads are well-aligned, do the other side as well. Don’t forget to tighten them sufficiently with the hex keys that are appropriate for the job.
3. Adjusting the tension of your cable
A side-pull brake could also be adjusted using a simple tension adjustment. In this situation, you might find that your cable is not that well-aligned and that you will also find the barrel adjuster not being in the right height as it should.
To fix this is to unscrew the barrel adjuster upwards, which is usually a clockwise motion depending on your bike brake setup. Then, tighten the bolt on the brake using your hex key tool.
Next, pull on the brake cable using the caliper being squeezed through your hands. Do this until the distance is at the right point so it’s not too high upwards. Test the lever by applying the brake on one side.
If you notice that one of your pads is hitting much earlier than the other, start turning the caliper so that the two brake pads will simultaneously hit the rim.
On your brake caliper, locate the spring tension screw and use your hex tool to screw. With this, the brake caliper should be adjusted in terms of position and placement. Further test and adjust as needed on your caliper brakes.
Be mindful of the pad position when you are adjusting the caliper. That’s because when you do rotate or move the caliper to different areas until you get your pads aligned, it might also affect the positioning of your brake pads.